Share
Pin
Tweet
Send
Share
Send
In such cases, I want to launch the remote control to hell, and manually switch the desired mode.
Why is this happening?
The fact is that in the past, higher-quality electronic components were used in household appliances. Now they are trying to save on everything by using parts at a lower price. It is the use of a cheap infrared LED with a low radiation power and a poor-quality lens that leads to the above problems.
What can be done in cases when the console does not work at all or works from a close distance?
Below in the article, a method for repairing and increasing the range of a remote control will be described. It does not take much time, and even less money.
Remote Control Diagnostics
You can check whether the remote control is working or not, in a simple way.
To do this, firstly, you need to insert new batteries into it. Secondly, turn on the phone’s camera and pointing the remote at it, press the “ON” button. The phone screen should show how the infrared diode lights up.
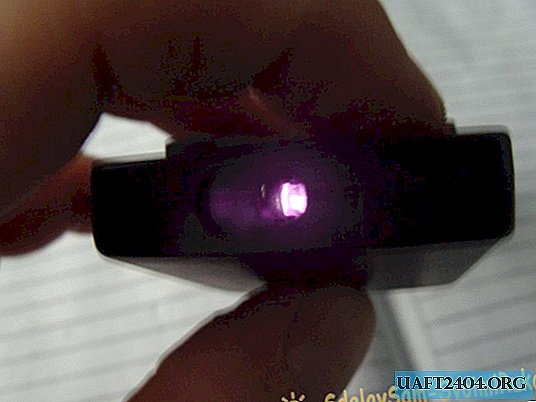
The human eye does not see this emission spectrum, and the phone’s camera captures it, and on the display this glow is similar to an ordinary LED.
If this does not happen, then the remote control is faulty.
In such cases, replacing the infrared diode may help.
The method of repair and modernization of the remote control is similar, therefore the modernization will be described below.

For example, the T2 digital television set-top box, controlled by a remote control, is taken.
The console itself has no complaints about its work, but the control panel leaves much to be desired. Even with new batteries, a person who wants to make some kind of switching needs to approach the device at a distance of less than two meters, which is not very convenient. If you are beyond this distance, the remote control becomes simply invisible, and it is impossible to control it.

Modernization - repair
The modernization itself is to replace the infrared LED with another, more powerful one.
You can take such an LED from the remote control from an old VCR, a faulty DVD player, an air conditioner or a music center.

If this is not at home, then a similar remote control can be purchased at flea markets for a penny. The main thing is that he was working and powered by two batteries with a total voltage of three volts.
Going to the market, you need to take two finger-type batteries to test the remote control, and a mobile phone, which, in principle, should always be nearby.
Having found a suitable remote control, insert batteries into it and turn on the phone’s camera. We direct the remote control LED to it, and press any button. A serviceable remote control should emit infrared light, which will be visible on the phone screen, in the form of a packet of pulses.

If this is not visible, then the remote control is most likely faulty, and there is no point in buying one.
In the photo, the remote control, either from the air conditioner, or from the air heater - is unknown, but it is definitely working, and with a powerful infrared diode. The air conditioner itself has long been gone, it has broken and could not be repaired. He will be the donor.


Usually, two halves of the remote control cabinet are fastened on a latch, but there are times when there is still a mounting screw, which is located under the batteries, in the battery compartment. If there is one, then unscrew it, and then, picking up with a knife the junction of the two parts, we separate them.


When the case is disassembled, inside it we find the control board on which the electronic components, the button pad and the infrared LED itself are located.


Next, set aside the old remote and take apart the one we want to upgrade. In our case, this is the remote control from the T2 console.
The disassembly principle is the same as in the first case. We unscrew the fastening screw - if there is one, and with a knife or a screwdriver, separate the halves of the case.


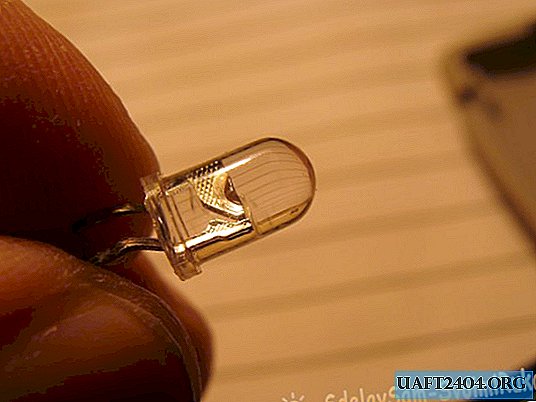
In the photo, a board with an infrared diode.


Next, we take a soldering iron for 25 or 40 watts, and solder the diode from the donor board.
It is very important not to overheat the device with a soldering iron, because semiconductor devices need to be soldered for no more than two seconds, otherwise they may break. Also, you need to be careful with the legs of the diode, so as not to bend once again, and not to break them.

Before you solder the diode, you need to determine the polarity - where is the anode, and where is the cathode, or the plus and minus terminals.

It happens that the polarity is indicated on the board, but most often there is no marking, so you should immediately determine where the positive output is and mark it on the board.
You can determine the conclusion in a simple way. You need to carefully look at the diode with a magnifier, and that conclusion in the case, which is shorter - the anode (plus), and the one that is larger and wider - the cathode or minus.

Having determined on the board of the T2 remote control where the positive output is, we make a mark, scratching it with something sharp, for example an awl.
Now you can solder the diode from the board.

Since the legs of a soldered donor diode are shorter than those that should be replaced, it is not necessary to solder the diode from the T2 board. It must be bitten off by nippers, leaving small conclusions. To them and solder the donor diode. Thus, the length should be sufficient so that the diode lens extends beyond the closed housing.
We tin down the conclusions on the diode, and the ends on the board, and carefully - observing the polarity - solder them to each other.

Check the strength of the solder by twitching the diode.

We insert the board into the bottom of the case and snap the top.

We install the batteries and check the operation of the remote control by pointing it at the camera of a mobile phone. As mentioned earlier, when you click on the buttons, a glow should appear.

The result of the work

This replacement of the infrared diode gave a very good result. The console began to confidently control the console at a distance of more than four meters.

At the same time, the current consumption from the batteries has not changed.
Share
Pin
Tweet
Send
Share
Send