Share
Pin
Tweet
Send
Share
Send
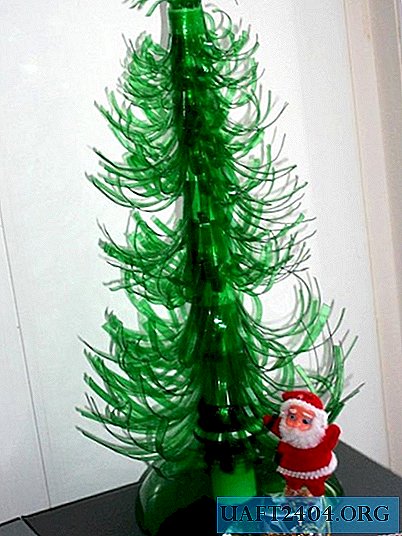
Do you think it’s unrealistic to make a do-it-yourself Christmas tree from an ordinary plastic bottle? And no! And now we will prove it to you. By the way, such a New Year tree looks pretty decent and very cute! A plastic Christmas tree can be put anywhere: at least on the kitchen window, at least on the nightstand near the TV, and at least on a children's rack next to toys and books. So, to the point ?!
Materials and tools for crafts.

To make a beautiful Christmas tree, we need:
• one ordinary plastic bottle for 2 liters of green;
• album sheet A4;
• duct tape (adhesive tape);
• scissors.
Agree, very happy that absolutely no glue! How to make a Christmas tree from a plastic bottle. Even the elementary school student will cope with the task, and it will not be difficult for an adult to make a plastic Christmas tree!
1. Cut the neck of the bottle so that you get a stand under the tree.

2. From the album sheet you need to twist the trunk for the tree in the form of a cone. The diameter of the tube will correspond to the diameter of the neck of the bottle. Insert the handset into the stand.

3. Now cut these plates in the amount of nine pieces. Features of these blanks: 3 pcs. make a rectangular shape measuring 8 cm by 7 cm; next 3 pieces - 8 cm by 5.5 cm; the last 3 plates are 6 cm by 4 cm. It is not necessary to maintain the size in numbers, but the proportions of the blanks must be observed: large pieces, medium and small.
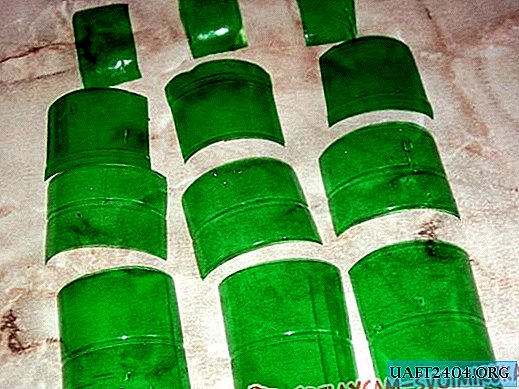
4. Each plate should be further incised in this way: before reaching the edge of a rectangular piece (approximately 0.7 cm), we cut strips 3-4 mm wide. It will be coniferous branches for our Christmas tree.


5. To make the branches lush, you need to twist them slightly: take the knife with the blunt side up and stretch it along the strip, firmly pressing the blade to the ribbons. No need to spin all the strips at once, it is difficult and inefficient. Take 4-5 ribbons.


6. Now you need to attach the needles to the paper trunk. To do this, wrap it with plates, starting from the base. Using tape, we fix each tier of needles. In the same way we move to the top.


7. The last tier is attached, so it's time to put the top of the tree in order. Twist one small plate of needles so that it can be inserted into the upper part of the trunk.


That's all, the green Christmas tree from the plastic bottle is ready! Happy New Year!
Share
Pin
Tweet
Send
Share
Send