There are at least five ways to properly arrange the junction of the laminate with the wall. This information is useful, first of all, for novice masters who make such repairs for the first time.
Moreover, please note that the methods of designing the joint described in this article can be used not only in the case of a laminate, but also when laying on a wall of parquet boards.
And the easiest way is to leave it as it is. In this case, the space between the wall and the strip of the laminate can not be filled with anything. However, at the same time, the panel itself should be cut as smoothly and accurately as possible.

Another important condition that it is desirable to observe when choosing this method is the design of the inner corner. It must be puttied and painted. Otherwise, the plaster will be visible.
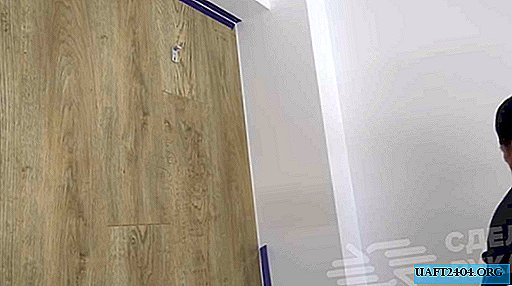
Silicone joint design
In this case, you need to choose the silicone of the desired shade. If it is difficult for you to decide on the manufacturer, choose Ceresit products.
For accurate application of silicone sealant, you will need a regular gun for it and rubber spatulas. You will also need masking tape.

First you need to stick a masking tape around the laminate (on the laminate and the wall itself), and then you can make the joint with silicone. Do everything carefully, and the seam will turn out beautiful.

This method can be applied on the floor - at the junction of a laminate or parquet board with ceramic tiles.

Cork Compensator Application
Another option for the design of the joint of the laminate and the wall is the use of strips of cork compensator. Their thickness can be different - 5, 7 and 10 mm. Usually it is enough to use strips of 5 or 7 mm.

Cork compensator is installed at the stage of installation of the laminate. And then all the excess must be cut off carefully with a knife flush with a laminate or parquet board.

In order not to scratch the surface of the wall during the cutting process, a piece of sheet metal or a regular spatula can be inserted between the expansion joint and the wall.

The result is a smooth and neat joint that you can paint in any color if you wish, or leave it as it is.

We put an external invoice corner
This option, like the very first, is considered the most budget. Moreover, the corner itself is desirable to choose a solid color.

Of the variety of corners, it is best to choose corners that are made of plastic. They are easy to cut with a knife, and therefore you do not need to use any additional tools.
To get a neat corner joint, the edges of the plastic corner will need to be cut off at an angle of 45 degrees.

If everything is done correctly, then in the end it will turn out, albeit a simple, but quite worthy junction design. And most importantly - inexpensive.

Using a decorative rope
This method is also considered one of the simplest and most affordable. You can buy a decorative rope in almost any hardware store. Moreover, both in the classic version and the original (and different colors).

The rope is laid at the stage of installation of the laminate, and nothing more needs to be done with it. Cheap and cheerful, and it looks very stylish.

A detailed review of the five ways to design the joint of the laminate and the wall is recommended to see in the video on our website.