Share
Pin
Tweet
Send
Share
Send
Nickel - cadmium (Ni─Cd) batteries are still installed in many screwdriver models, but these are far from the most ideal energy carriers. They have low current efficiency, memory effect, high self-discharge, maintain a low charging current (they are charged with a low current for a long time) and have a relatively low specific capacity. Taking into account all of the above factors, their replacement, for example, with lithium - ionic ones (Li─Ion) just begs.
But is this replacement so good?
This issue is worth focusing on. For a screwdriver user, installing lithium-ion batteries reveals some of the previously inaccessible "chips":
- 1 - you can recharge the batteries after a short work, this will not reduce their capacity;
- 2 - batteries will work out a greater number of charge-discharge cycles. When the resource is exhausted, they can be easily replaced.
- 3 - Charging will take place many times faster (approximately 1-3 hours, against 13-15 for nickel - cadmium).
But there will be cons:
- 1 - Lithium - ion batteries are more expensive. You will have to pay 250-500 rubles per piece.
- 2 - The next minus is their whimsicality to charging - they do not tolerate either overcharging or overdischarging and, frankly, it is better to charge them with a "smart" charger, which, when a certain voltage is reached, reduces the current supplied to the batteries.
And which batteries to buy?
In order not to overpay and take exactly what you need, look at the characteristics of your screwdriver. It should indicate power consumption and voltage. The first should be divided into the second - you will get the maximum value of the current consumed by a screwdriver. When choosing a battery, you need to focus primarily on its current output (you can see its specifications), since if too much current is removed from the battery, it can ignite, heat or release hazardous gases.
Among the batteries with high current efficiency, the following models are popular: Samsung 25R, LG HE2, LG HE4, Sony VTC5.
And how many batteries to buy?
A charged 18650 battery produces 4.2 volts. Divide the voltage from which the screwdriver works by 4.2 and round it up (for a 12-volt screwdriver - 3 batteries).
Disassembly.
Unscrew the screws located at the bottom of the battery compartment.

After that, carefully open the battery compartment. It will contain a battery assembled from nickel-cadmium batteries.

Top batteries by spot welding are attached to the contact group of the battery compartment of a screwdriver. You can disconnect the batteries from the terminals with a knife, if this does not work out - have a bite of the contact pad going from the terminal to the battery, above the weld point. Dispose of the removed battery at the designated location.
Assembly.
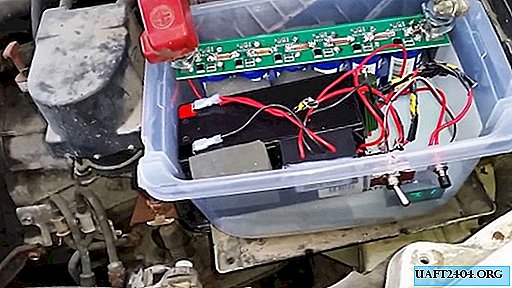
The project involves the quick removal of batteries (so that at the end of work, you can easily put them to be charged on a stationary charger, for example, NITECORE I4 (The site //sdelaysam-svoimirukami.ru also has articles on how to assemble a budget charger for data batteries)), so 2 x 18650 holders were used.

To achieve the desired voltage - it is necessary to connect the batteries in series (With this connection, the plus of the battery is connected to the minus of the subsequent). Since I used 2 holders, they must be connected to each other for current exchange

The initial wires of the holders were too thin, because of which there could be losses on heating, to avoid this they were soldered to wires of a larger diameter, taking into account the new location of the batteries.

For an approximate indication of the battery charge level, a 12V LED was used, connected in series with a 1 kΩ current-limiting resistor.

Do not forget about isolation.

The power of the LED must be brought out parallel to the power of the screwdriver. To do this, wires of a smaller section are soldered to the thick wires of the plus and minus of the battery pack.

Wires of a larger cross section must be soldered to the terminals of the battery pack of the screwdriver, in my case they are placed on a separate plate, and after that, the plate is returned to its normal position, fixing it with glue if desired.

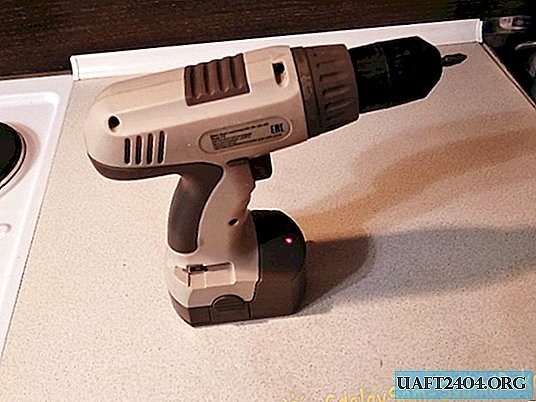
To observe the LED in the battery case, you need to make a hole (for this, a heated nail is good).

Since the LED performs the function of an indicator rather than a lighting fixture, you can fix it in the hole by applying hot-melt adhesive to it (due to this, the glow will become softer). Photo screwdriver after processing.


A video demonstrating the power of a screwdriver on new batteries is included.
Please note that for the batteries to work properly in series, they must be “married”, in other words, they must be taken from one batch, one capacity and model. Subject to this rule, they will be discharged at the same time. To check the charge of the batteries and prevent their overdischarge, use the LED (the smaller the charge, the more dim the light it emits. Without proper training, this is not so easy, so be sure to check the voltage on the batteries with a voltmeter).
Share
Pin
Tweet
Send
Share
Send