Share
Pin
Tweet
Send
Share
Send
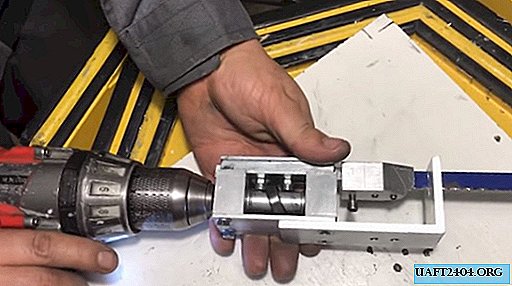
Homemade, considered today deserves attention, if only because it really helps to solve the problem of sawing with a conventional drill or screwdriver. It is permissible to make it at home with your own hands. And this is not some disposable device. This is a full-fledged technical tool-nozzle, which expands the capabilities of the main electrical device, which, as it seemed to us, was intended only for drilling and twisting self-tapping screws. With it, you can really cut a bar or even a board with an ordinary hacksaw blade and turn an ordinary drill into a reciprocating saw. Let's see how this can be done.
The principle of operation of the saw
In fact, the drill torque does not go anywhere. It is only transformed by the likeness of a friction transmission into reciprocating motion due to a crookedly mounted bearing. Its body slides between two small bearings mounted vertically on a small metal square. It is this element that drives the web, tightened at its end in a special clamp. The nozzle is mounted on a shaft machined for a sufficient diameter under the drill or screwdriver chuck.
We make a nozzle for sawing wood
We make a reservation right away that such a device is not going to be available from improvised means. Most of it is quite accurately calibrated in size, machined on turning and milling machines. However, if you doubt the capabilities of your workshop, they can always be made to order.
Before starting work, it is worth making a drawing of this assembly, having calculated the sizes of each element and verified them proportionally. Our fixture is made entirely of metal, and therefore the vice this time is a must-have tool.

Making a shaft with a bearing
This element requires a metal rod. If possible, its cross section should be the same, so it is best if it is machined on a lathe.

We clamp it in a vice, and approximately in the middle we file with a file an oblique groove as in the photo.


We turn the rod over the opposite side, and make a mirror groove leaving a thickness of only 2-3 mm to accommodate the bearing.


We put the bearing on the shaft seat, bored with a file. We will need the most ordinary bearing - ball, single row, open type. The landing hole, as well as the diameter of the outer ring, will have to be selected empirically.


To fix the bearing on the shaft, special clamps will help. We make them from segments of a tube that fits snugly onto the shaft. Cut these segments exactly to the angle of the bearing. To clamp on the shaft, these tubes must be equipped with a hole with a screw for a small hexagon, as a limiter for drills.


We fix these clamps by pressing them firmly against the bearing housing so that their walls touch only its inner ring.

We take four washers of suitable diameter, and put them in a pair on each side of the shaft. This will help reduce the friction of the shaft clamps against the side supports of our nozzle during operation. The shaft with the bearing is ready!


We equip the case of our device
Surely everyone understands that the shaft itself will not work separately. For him, emphasis is necessary on which he will hold, and regarding which he will move. They should be as in the photo - two squares with holes for the shaft free-wheeling on the side of the planes, and mounting holes with thread for bolts on the side of the ribs. This design is going like this (photo).


We cover the structure with a small plate with four through holes at the edges and fix it to the bolts. This will be the first housing cover.


At this stage, our nozzle should look like this (photo)


On the opposite side we place two squares with mounting holes for the bolts. They should be of such a size that the third square, which will be placed between them, can move freely relative to them.

The middle square must be prepared. We place two small bearings on the screws on it. They will slide along the main large bearing mounted on the shaft.


We cover the squares with a lid similar to the first, and we attract it to the screws. The nozzle is almost ready. You can trace how the shaft moves with the bearing, pulling the middle square back and forth.


We make a tip for a reciprocating saw
In order to secure the hacksaw blade, an adapter clamp is required. The tip proposed by the author has an end groove of square cross section. On the side of the planes, clamping bolts for a hex key are placed. When tightly clamped, they are flush with the tip plane.


We put the tip-clamp on the middle square, and fix its position with a clamping bolt.


Now we insert the hacksaw blade into the tip, and fix it with the next two clamping bolts.


To stabilize the work of the moving square with the blade during sawing, add a stop corner (photo).


We fix it to two screws, and center the groove on its edge relative to the canvas.


The reciprocating saw is ready for the drill. It is convenient and safe to hold in your hands, and it takes up very little space. Such a tool is really worth making for your workshop, because it can help out at the right time with sawing wood. It remains only to test it in action and make sure of the wide capabilities of your tool!


Share
Pin
Tweet
Send
Share
Send

