Share
Pin
Tweet
Send
Share
Send
True, sometimes, we wear this beloved thing to a state where it seems that you can no longer wear it, but it is a pity to throw it away. To prolong the life of jeans in this situation will help the ability to cut and sew. Only now the thing will be redone for the baby.
Too shabby and tattered places on the panels of jeans trousers can be circumvented in a cut without affecting the appearance of the product. But the child runs for some time in a new thing (until he grows up), and the family budget will be saved, just for new jeans for dad or mom.
In general, from jeans of an adult man, with a clothing size not less than the 50th, it is quite possible to carve out quite loose trousers for a baby of 1.5-2 years old.
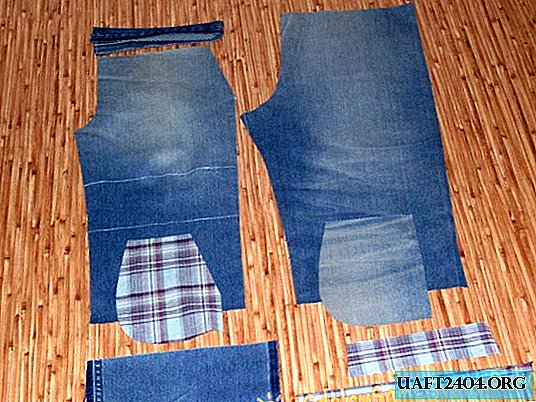
Details of the cut of children's jeans will not differ much from adults:
- Front halves of trousers;
- Rear halves of trousers (one-piece according to the model with a belt);
- Cutting barrel (one-piece with the upper lining of the side pocket);
- Top lining of the side pocket (made of finishing fabric);
- Belt of the front of the trousers;
- Knee pads;
- Edging for a decor of kneecaps (from a finishing fabric);
- Adjustment strip for the decor of knee pads (made of finishing fabric).
All details, except No. 5 and No. 8, are cut out in pairs in mirror image.
A pattern of children's trousers can be downloaded from the Internet or copied using a proven magazine for sewing for babies.

The edging for the decor of knee pads is a strip 2.5 cm wide and slightly longer than the width of the knee pad itself. Each edging for the edging must be ironed along the length, and then stitched to the upper cut of the knee pad with a 1 cm seam.
After this, the edge of the seam of the grind of the edging must be ironed in the direction of the inside of the knee pad. The result is a neat edge and a narrow edging.

Then the trim strip for the decor of the knee pads should be ironed along one long edge 1 cm to the wrong side.
The ironed strip should be cut into 2 equal parts (in width). Each part must be stitched on the bottom of the knee pad with a corner, as shown in the photo.

Knee pads prepared in this way must be stitched onto the front halves of jeans.
The lower section of each knee pad should be bent similarly to the upper. For ease of operation, knee pads can first be pushed or pinned to the main part.
After sharpening, the knee pads should be carefully ironed on the front and back sides.

After that, you can start processing the side pockets with an undercut barrel.
First of all, you need to duplicate the allowance for processing the entrance to the pocket. For this purpose, a narrow strip of adhesive pads glued from the inside of the part is ideal.

Then, the upper lining should be stitched to the pocket entrance. Suture stitching - 5-7 mm. Details must be aligned in slices and face each other.

The stitched lining should be unscrewed on the wrong side of the jeans and ironed, straightening a narrow piping similar to the piping on the knee pads.
Then you need to lay the finishing line (two can be) at the entrance to the pocket.

Next, you need to grind the scoring barrel. To do this, it must be imposed on the upper lining of the pocket (wrong side - to the wrong side), trimmed into sections and sewn with a 5 mm seam.

Next, the lining must be turned out, the allowances straightened. If necessary, the seam can be ironed. Along the edge of the pocket lining you need to lay a machine line with a width of 7-10 mm. The stitch length should be medium or slightly less. Such a line would be better to “hold” the fabric, it will not tear or wear out soon.

The processed pocket must be secured with auxiliary stitching on the upper and side sections of the trousers. At the same time, you need to fix the tucks along the waist provided by the jeans model.

In the same way it is necessary to prepare the second front half of trousers.

Then they must be connected to each other along the middle seam, the allowance of which must be swept and ironed.

A belt for trousers can be cut directly from the belt of jeans from which they are sewn, with the difference, however, that the children's belt should be an order of magnitude narrower. In finished form, it can be made 2.5 cm. For a baby this width will be enough.
The belt should be ironed in length in half. One longitudinal edge should be overcast.

With a raw edge, the prepared belt must be sewn to the upper section of the trousers. Stitching seam - 1 cm. It is better to iron the seam allowance up. This will simplify further processing.


The swept edge of the belt needs to go around the upper edge of the front of the trousers.
The girth of the belt should overlap the seam of its grinding by 1 cm. For convenience, the bent belt can be sketched or stabbed with pins.
The bottom edge of the belt should be given a finishing line. If necessary, the belt can be ironed from the wrong side.

Harvesting the rear halves of the trousers includes only 2 operations. First you need to connect them together along the seam of the seat (it is better if the stitch is double, for strength). Then you need to overcast the lower section of the belt, and iron the belt itself on the wrong side of the product by 3.5 cm.

Next, proceed directly to the installation of trousers.
First of all, you need to grind the side seams of the product. An allowance of the belt of the rear halves should bend around the front halves by 3.5 cm. The seam allowances should be swept over.
After you can process the step seams of the trousers (both at the same time).

2 narrow or one wide (up to 2.5 cm) elastic braid should be sewn to the ends of the belt of the rear halves.

Then the belt allowance must be turned inside out, the rubber band inside the resulting drawstring should be evenly stabbed, and one or two finishing lines should be laid along the belt itself.

Pants need to be turned on the front side. Side and step seams should be ironed on a special block through the iron.
At the same time, you need to iron the allowance for hemming - 4 cm. For convenience, it can be marked and pinned with pins in several places.


After that, you need to hem the bottom of the trousers with a seam in a hem with a closed, twice bent section.


In the finished form, jeans, if necessary, can be ironed with steam.
The new thing for the baby is ready!
Share
Pin
Tweet
Send
Share
Send