Share
Pin
Tweet
Send
Share
Send
To work, we need the following:
• White cardboard, a large sheet or watercolor paper;
• Two sheets of paper for scrapbooking from the series "School Pages";
• Color picture on student theme 5.5 * 5.5 cm;
• Transparent cover 11.4 cm * 15.3 cm, it is folded, and when expanded it is 11.4 * 30.6 cm;
• Felling from dense color cardboard: a feather from kraft paper and a beige flower;
• Ribbon rep 9mm wide creamy pink;
• Beige lace;
• Metal pendant globe;
• Brown beads;
• The printed inscription "Gradebook" and gold ink for tinting;
• Scissors, pencil, ruler, PVA glue;
• Double-sided tape;
• Sewing machine;
• Glue gun.

So, first we need to make a base from thick cardboard or watercolor paper. We take white cardboard or you can light gray. We try to choose the color scheme of cardboard to match the tone of the scrapbook paper. So the color transition will be smooth, and the product will be harmonious. Cut out a cardboard blank 11.3 * 30.5 cm.


We divide this workpiece in half, for this we make a scoring under the ruler with scissors, an invisible bending line. Fold in half and ironed several times.


From the scrapbook paper, now we cut out two rectangles of 11 * 15 cm in different colors.


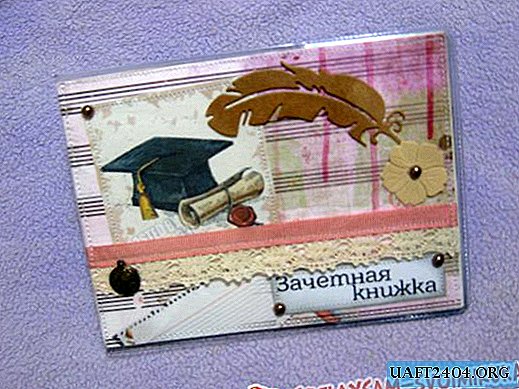
We take a color picture and a printed inscription "Gradebook" in the form of a small rectangle.


With a gold pad we tint the edges of the rectangle with the inscription, so we create an antique effect.

Glue a picture and an inscription on one scrapbook paper, look at the photo below. And now individually we sew each fragment on a typewriter.


We cut a section of rep ribbon 18 cm long and cut a strip of lace of the same length.


We put lace under the picture, wrap it up and glue tape on the sides, put tape on top of the lace, also wrap it up and glue it with pieces of tape. Together, we sew the ribbon with lace with a typewriter.


Now in gold ink we tint the cardboard base along the edge, as does the inscription.


Now we glue the scrapbook paper on cardboard, on double-sided tape. Sew each side separately on the machine along the edges, we retreat 2 mm from the edge.


Now decorate the cover. Glue PVA glue paper cuttings. We glue the half beads and the metal pendant with a glue gun, as in the photo below.


Now just insert the cover into a transparent and done. You can now insert your record in it and you're done! By the way, also a very necessary gift, for example, for his classmate.


Share
Pin
Tweet
Send
Share
Send