Share
Pin
Tweet
Send
Share
Send
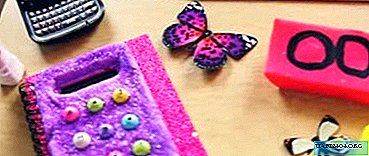
For what reason were such colors, style of execution, idea with a business card and daisies-names chosen? The fact is that, creating this card from scratch, I was guided by some information about this person. He is an adult man, has a good sense of humor and has his own business. The birthday boy has three flowers - this is his beloved wife and two beautiful daughters. Having gathered all the information puzzles together, I got just such a picture.
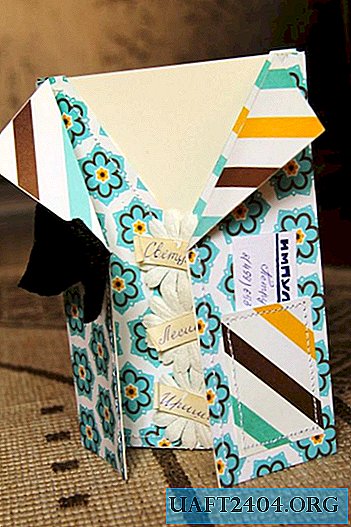
This is just an example that can be taken as a basis when working on a unique postcard. Show your imagination, courage - you too will be able to surprise your relatives and friends. Go for it!
To work on a postcard you will need the following materials:
- blank for postcards (or thick paper),
- paper for scrapbooking with various patterns,
- threads
- sewing machine (you can use an awl or a manual sewing machine),
- double sided tape,
- paper daisies (other flowers or decorations),
- plain paper,
- scissors
- ruler,
- glue stick,
- coffee with cinnamon,
- velveteen (for a butterfly),
- watercolor paper (for a business card),
- velvet colored paper self-adhesive (for a business card),
- good mood.
I will make a reservation right away that I used a manual sewing machine without a thread only because it can make holes through an equal number of millimeters. This miracle unit does not fulfill its functions as intended. Alas.
And do not forget to draw lines of firmware with a pencil and ruler.
We start to create!
1. From the blank for the postcard you need to make a "shirt". To do this, bend the edges that embody the future "collar".


2. Pick up the paper you want to scrub the color you want and cut out two rectangles. Do not rush to glue them on the workpiece. Sew the perimeter of the rectangles with a sewing machine, and then fix it on the blank for the postcard.


3. Choose the color for the collar. Cut the triangles, they can be immediately glued to the base. I did not flash these fragments.


4. We make a "pocket" for a business card. It is necessary to cut a rectangle from paper for scrubbing of a suitable size, stitch it around the perimeter.

Only after that can the “pocket” be glued to the “shirt”. Try to smear with glue mainly the lower part of the "pocket" and sidewalls, then it will be possible to put a business card in it.

5. In my version of the postcard, the back of the shirt is white on the outside. You can also trim it with colored paper.
6. Let's deal with the inside of the postcard. Cut to size "vest". We sew these two fragments separately on a typewriter, only then we fix them on the workpiece with glue.


7. We make the internal “pocket” according to the well-known pattern: a fragment was cut to size, sewn separately, glued to the base. 13.jpg
8. The buttons on the "vest" will be symbolic. Three daisies - three favorite flowers in the life of this man (I made them nominal). Chamomiles can be fixed with double-sided tape.


9. In order to display the names of your favorite flowers, you need to cut out small strips of plain paper, soak them in a solution of coffee with cinnamon, and let dry. When the papers are dry, slightly bend both edges, leaving room for the name to be written.

10. The logo for the business card was made using self-adhesive velvet paper.

11. We proceed to the manufacture of "butterflies" to our business man. Cut a rectangle from the fabric (I have a velveteen).

If the thread at the edges is strewed, they need to be sewn up. Cut a still small narrow fragment from the fabric, it will fix the middle of the “butterfly”. After that, sew this small fragment strictly in the middle of the rectangle of the future “butterfly”.

Make a seam on the reverse side. It’s best to attach a butterfly to one side of the card using double-sided tape.


Do not forget to leave your signature or creative alias on the product.
Good luck
Share
Pin
Tweet
Send
Share
Send