Share
Pin
Tweet
Send
Share
Send
Our ancestors played with such or similar animals. For the most part, children's toys were home-made, made from improvised materials. At first, the parents gave the “master class” for fun, and then the children made it themselves, creatively improving in the process. Needlework always turned out unique, original. I’m sure that, despite the abundance of modern toys, it will be interesting for you and the children to make such a kitten yourself according to the great-grandmother’s “recipe”.
You don’t need any special skills in sewing, so you can safely begin to create a toy from fabric.

We will prepare a shred of a square shape (not necessarily perfectly flat). Color and type of material do not matter. From a motley or colorful fabric, the toy will look more fancy.
The size of the material also does not matter. The larger the flap, the larger the size of the cat. But the little cat looks more elegant. Although it may seem convenient for someone to start tinkering with a big one. In this homemade square was 18 x 18 cm.

Fold the fabric diagonally.

We fasten the sides of the triangle with a seam “forward needle”, as shown in the photo. The seam length is about two-thirds of the lengths of the sides.

We twist the triangle, hiding the seams inside.
The torso is almost ready. Angle 1 will be the seal’s head, angle 2 will be its tail, the lower corner, which has not yet been sewn up, is the future paws.

We take the body around the corner 1, make out the ears on the head. Bend the tip (1-1.5 cm) of the corner inward. Fold the fabric so that the seam line runs in the center of the flap and coincides with the back (former hypotenuse).
Now in the middle, as in the photo, make 2-3 tight stitches. Fasten and cut the thread.

We generously stuff the body with cotton (or synthetic winterizer).

On the back of the cat, we make a small fold to indicate the bend of the back. To fix the crease, sweep it in the middle with a pair of stitches.

Two wax crayons are the paws of a cat. They can be replaced with a pair of pencils, or rather, their leftovers, chopsticks for sushi, any branches suitable in thickness.

We take one crayon, apply it to the edge of the fabric (the left tip "looks" at the cat's head). Wrap in fabric (2 tight turns).

With light stitches we sew the fabric to the entire height of the paw. We carry out the same operation with the second crayon.

Fold the crayons together. We mask the unstitched part of the corner, hiding inward. A pair of stitches behind the legs connect the layers of fabric.

From the non-sewn part of the fabric behind the paws, we make a fold, a transverse seam.

Fasten it with a pair of stitches to the right and left.

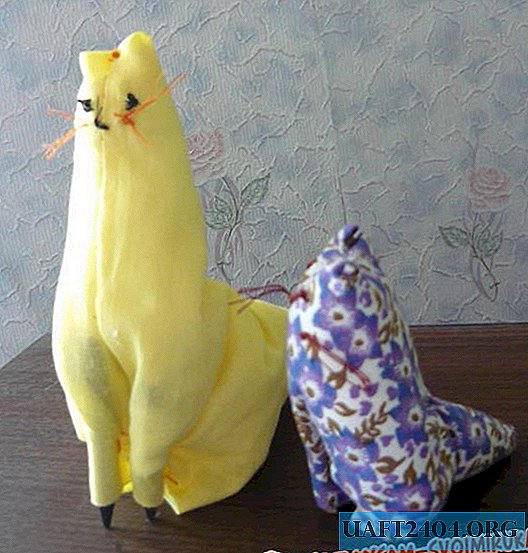
Prababushkin cat is almost ready.

On the face, embroider eyes, mouth, create a mustache.

Work took about 20 minutes. I wanted to try to make the cat smaller. From a patch of patterned fabric purr turned out to be like a fairy-tale character.
Share
Pin
Tweet
Send
Share
Send